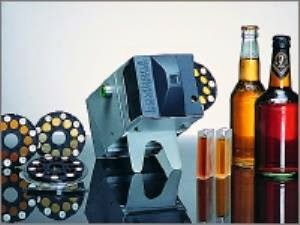
ZAHM COMPUTERIZED PIERCING DEVICE SERIES 14000
Hãng sản xuất: ZAHM & NAGEL – Mỹ
The Zahm Computerized Piercing Device is a newly developed instrument for testing volumes of C0
2 gas in bottles and cans. Gas volumes are measured directly by the computer; thereby eliminating the need for C0
2 gas
conversion charts and yielding very accurate, reliable results even in
the hands of an inexperienced operator. Both temperature and pressure
are LCD displayed and can be re-calibrated by the operator. Two C02
conversion tables can be installed in the computer (for example, sugar
and diet beverages/beer and water). Data memory and read out are
available for 5 samples. Altitude correction factors can also be
entered. Available in one and two litre sizes. Computer and thermometer
may be ordered separately for attachment to existing Zahm Piercing
Devices. Please specify when inquiring about this instrument whether you
wish a beer or soft drink model. Soft drink models also need to
indicate whether the unit is for a Coca Cola plant since these require a
different formula in the computer.
CAUTION: Eye protection must be worn while operating this instrument.
The instrument is ready for product testing as received from the
factory, but several checks should be made in order to assure that none
of the fittings leak when testing is performed.
1. Apply a small amount of "O" ring lubricant to the temperature
sensor stem and work it up and down to lubricate the "O" ring (6008).
"O" ring lubricant may be purchased from Zahm and Nagel Co.
2. Pressurize the instrument and apply a soapy water solution to all
fittings. The formation of bubbles will indicate any leakage, and the
condition can then be corrected. Do not apply solution directly to the
temperature sensor, computer housing, or its electrical connections
To Operate:
1. Turn on the computer (14003) by pressing ENTRY button. The display will show "ON" and then 0.0.
2. Close the snift valve (5077) and depress the lock plates (5026)
while pulling up on the cross bar (6019) to a height that will clear the
top of the container being tested.
3. Release the lock plates and the cross bar will remain in position until the operator is ready to pierce the container.
4. Raise the temperature sensor (14004) so that it touches the thermometer stop (6006).
5. If testing cans, place upside down on the base pad (5023) and
center so that the rubber seal (6013) will line up approximately in the
center of the container. Bottles should be tested by piercing through
the crown.
6. Depress the lock plates and lower the cross bar to a point where the rubber seal just touches the top of the container.
7. Continue to depress the lock plates and with both hands, push the cross bar rapidly downward until the container is pierced.
8. Release the lock plates. The cross bar will remain locked in place
with the rubber seal compressed to prevent leakage at the point of
piercing. Be careful not to trip the lock plates after piercing as only a
slight upward pressure on the lock plates will release the cross bar
and cause the container to lose its pressure.
9. Insert the temperature sensor (14004) to its fullest extent into the container.
10. Hold the instrument by the base (5021) and one of the guide rods
(5018). Shake the instrument with a rapid back and forth motion until
maximum pressure is displayed on the computer. Set instrument down and
press ENTRY key to display volumes of CO2 gas. Press ENTRY twice to
display temperature. Press ENTRY key again to return to pressure mode.
11. After the test has been completed, bleed off pressure slowly
through the snift valve. To prevent product from spraying the operator, a
piece of plastic tubing should be attached to the hose nipple (5057) of
the snift valve and the product drained into a sink or other suitable
container.
12. Withdraw the temperature sensor until it touches the thermometer stop (6006).
13. Depress the lock plates and raise the cross bar to clear the container.
14. Close the snift valve and remove the container. The instrument is
now ready for the next container to be tested. If no further testing is
required, turn the computer off by pressing the ENTRY key for three
seconds.


6006
|
Thermometer Stop
|
14004
|
Temperature sensor
|
5018
|
Guide Rod 19" Long (2 req'd) for 2 liter size tester
|
5057
|
Hose nipple (Teflon)
|
14003
|
Computer
|
5058
|
Nipple nut
|
6019
|
Cross bar for 2 liter size Tester
|
5077
|
Snift Valve
|
5027
|
Lock Springs (2 req'd)
|
6007
|
Thermometer Adapter
|
5026
|
Lock Plates (2 req'd)
|
5044
|
Nut Gasket
|
5028
|
Lock Screws (2 req'd)
|
5043
|
Packing nut
|
5023
|
Base Pad for 5021 Base (2 req'd)
|
6013
|
Rubber seal
|
5021
|
Base (2 liter size)
|
6011
|
Piercing Needle 0.703 OAL of Piercing Point
|
6008
|
Adapter "O" Ringer
|
5017
|
Guide Rod 15" long (2 req'd) for 1 liter size tester
|
6009
|
Adapter Nut
|
6018
|
Cross bar for 1 liter size tester
|
5038
|
Gauge gasket (nylon)
|
5022
|
Base Pad (top) for #5020 Base
|
5039
|
Gauge Adapter
|
5020
|
Base (1 liter size)
|
5040
|
Adapter Gasket (nylon)
|
5022A
|
Base Pad (bottom) for #5020 Base
|
SERIES 11000 ZAHM MODIFIED PIERCING DEVICE
Hãng sản xuất: ZAHM & NAGEL – Mỹ

The Series 11,000 Piercing Device is a modified Zahm New Style Air
Tester (Series 5000) with the burette (5003-25), burette clamp (5006),
support rod (5016), level bottle & stand (5047/5050) &
connection tubing (5052) omitted. This instrument is used where a
separately mounted burette is preferred for air testing or where a fast,
simple closure piercing unit is required to measure pressure. Where
samples are tested at room or known temperature, gas pressure can be
quickly obtained to determine CO
2 gas volumes. Refer to the line drawing and parts list for ordering replacement parts.
This instrument comes completely assemble with a 2" Dia. dual scale (0-60 psi & 0-4.2 kg/cm
2)
pressure gauge. If the gauge is not required it may be removed and the
1/8 NPT gauge plug (11004) inserted in its place. The standard Whitey
valve (5056) may be replaced with a straight hose cock (11003) if a hose
connection is required. All replacement parts are the same as those
found on the Zahm New Style Air Tester (Series 5000).
Operating Instructions
Warning: Eye protection must be worn while operating this instrument.
Note: Before using this instrument it should be tested for any gas
leaks that may occur at the various connections. This may be
accomplished by pressurizing the instrument and applying a soapy water
solution to the various connections. A bubble will form if any leaks are
occurring The instrument may also be pressurized, submerged in a glass
tank of water, and leaks detected in this manner.
Operation:
1. Place the bottle or can to be tested on the base pad (5022) and
lower the cross bar (5024) to the point where the rubber seal (5045)
just touches the top of the container The cross bar is lowed by
depressing the lock plates (5026) on each side of the cross bar and
pushing downwards.
2. With the lock plates still depressed, push rapidly downward with both hands on the cross bar until the container is pierced.
3. Release the lock plates. The cross bar will remain locked in place
with the rubber seal compressed to prevent leaking at the point of
piercing. Be careful not to trip the lock plates after piercing as only a
slight upward pressure on the lock plates will release the cross bar.
4. Hold the instrument at the bottom of the base with the right hand
while the left hand holds the guide rod (5017). Shake the instrument
with a rapid back and forth motion until maximum gauge pressure has been
obtained. Record this pressure if volumes of CO2 gas will be
determined.
5. Bleed off the pressure in the container by opening the Whitey valve (5056).
6. Depress the lock plates and raise the cross bar high enough to remove the container.
Determination of Volumes of CO2 Gas
Quick disconnect of the PAT unit for carbonyl analysis (achieved by
bubbling the carbonyl into a gas washing bottle containing 0.25% 2.4
dinitrophenylhydrazine in 2/n HCl to form carbonyl derivatives, which
can be analyzed by HPLC).
Cleaning of the Instrument:
When the tests have been completed the instrument should be cleaned as follows:
1. Open the Whitey valve and attach a water hose to the nipple of the
Whitey valve. Backflush with warm water for several minutes.
2. Remove the pressure gauge from the gauge adapter (5039), rinse in warm water and dry.
Calibration of Pressure Gauge:
The pressure gauge should be tested for accuracy at the beginning of
each shift.. Procedures for re-calibration are sent with the instrument
and are available upon request from Zahm & Nagel Co.

11001 Zahm Modified Pierceing Device - 1 Litre Size
1030 Pressure Gauge
5017 Guide Rod (2 Req'd)
5020 Base - 1 Litre
5022 Base Pad (Top) - 1 Litre
5022A Base Pad (Bottom) 1 -Litre
5024 Cross Bar 1 - Litre
5026 Lock Plate (2 Req'd)
5027 Lock Spring (2 Req'd)
5028 Lock Screw (2 Req'd)
5038 Gauge Gasket
5039 Gauge Adapter
5040 Adapter Gasket
5042A Piercing Needle (.703 OAL Piercing Point-STD.)
5043 Packing Nut
5044 Nut Gasket
5045 Rubber Seal
5053 Can Stop (2 Req'd)
5054 Can Stop Screw (2 Req'd)
5055 Whitey Valve
5056 Whitey Valve W/5057 Nipple & 5058 Nut
5057 Hose Nipple
5058 Nipple Nut
5059 Replacement Parts for Whitey Valve
5059-1 Handle
5059-2 Stem
5059-3 Packing Nut
5059-4 Panel Nut
5059-5 Teflon Washer
5059-6 Top Gland
5059-7 Bottom Gland
5059-8 Body
+ MÁY ĐO KHÍ CO2 TINH KHIẾT
Model SERIES 10000
Hãng sản xuất: ZAHM & NAGEL – Mỹ
 Description:
The Purity Tester consists of a caustic reservoir and calibrated
absorption burette mounted to a PVC polished frame. The reservoir and
burette are held to the frame with two neoprene covered mounting bands
that are adjustable from the rear side of the frame. The absorption
burettes are available in five different calibrations, with the standard
burette graduated in tenths of one percent, the total being one percent
of the volume of the burette. The caustic reservoir (10100) has a line
indicating the level to which caustic solution should be added, which
volume is slightly in excess of the capacity of the absorption burette.
The line drawings should be used for identification of the Purity Tester
parts. When inquiring about our gas purity testers, please specify
which absorption burette you require.
Operating Instructions:
Caution: Caustic solution is used in the operation of this
instrument. This solution may cause severe burns to the operator if not
handled with care. Wear goggles and protective clothing while operating
this instrument.
Preparation of Caustic Solution:
A 20% solution of either Potassium Hydroxide or Sodium Hydroxide is
recommended for air testing*. To make a 20% solution slowly add 100
grams of Potassium or Sodium Hydroxide crystals to 500 cc's of distilled
water and store in a sealed jar. The Hydroxide solution may also be
purchased from any laboratory or chemical supply company. *A weaker
solution may be used, but the tests will take longer and fewer tests can
be performed.
To Operate:
1. Attach a hose from the CO2 gas supply that is to be tested to the
nipple of the absorption burette. Use care when attaching the hose so as
not to break the calibrated stem of the absorption burette. If using
the 1/100th calibrated burette (10102) place your finger on top of the
stem and push gently downward onto the support block to prevent the stem
from breaking when attaching the hose. Make sure that the gas supply is
regulated to below 10 psi before releasing gas into the Purity Tester.
2. Open both cocks (5005) and allow the gas to sweep through the
absorption burette and caustic reservoir to completely displace air in
the glassware. If preferred, the bulb may be first filled with water and
the water displaced with the gas to be tested.
3. After the sample has been taken, close the cock on the absorption
burette first and then close the cock on the caustic reservoir.
4. Pour the caustic solution into the reservoir to the line indicated on the bulb (approximately 105 cc).
5. Open the cock on the caustic reservoir and allow the solution to
flow down into the absorption burette. Absorption of the CO2 gas now
takes place until only air in the sample remains, the small bubble of
which may be moved around by tilting the Purity Tester slightly, thereby
insuring complete absorption of the gas.
6. Close the cock on the caustic reservoir and turn the instrument 90
degrees so that it rests on its other frame side. In this position, the
unabsorbed gas enters the calibrated neck where the volume is directly
indicated. The percentage purity of CO2 gas is 99%. plus 1/10 of 1% for
each division as indicated by the level above the bottom graduation
(Using the standard absorption burette #10101). There are our other
types of absorption burettes available which are listed below.
7. After the test is completed, empty the caustic solution from the
Purity Tester. Place the Purity Tester over a container and open both
cocks to allow the caustic to drain out. Rinse out all traces of caustic
with warm water and dry the glassware before returning the tester to
its case.
Absorption Burettes Available:

P /N
|
Graduated In
|
Scale:
|
10101
|
0.10%
|
99 to 100%
|
10102
|
0.01%
|
99 to 100%
|
1.00%
|
79 to 99%
|
|
10103
|
1.20%
|
99 to 100%
|
10104
|
1.00%
|
50 to 100%
|
10105
|
0.10%
|
95 to 100 %
|

10001 Standard Tester W/Stand, Bands, Reservoir & Burette (99 to 100% In 0.1% increments)
10101 Calibrated Absorption Burette (99 to 100%In 0.1%)
10100 Caustic Reservoir
5005 Teflon Stopcock
10107 Rubber Covered Band W/Nut (Fits #10101 Burette)
10109 Rubber Covered Band W/Nut (Fits #10100 Reservoir)
10110 Frame - 2Pc W/Center Block
10113 Metal Case
10114 Plastic Connector
10003 Tester W/Stand, Bands, Reservoir & Burette (99 to 100% In 0.01%)
10102 Calibrated Absorption Burette (99 to 100%In 0.01%)
10100 Caustic Reservoir
5005 Teflon Stopcock
10108 Rubber Covered Band W/Nut (Fits #10102 Burette)
10109 Rubber Covered Band W/Nut (Fits #10100 Reservoir)
10111 Frame - 2Pc W/Center Block and support block
10113 Metal Case
10114 Plastic Connector
+ MÁY ĐO ÁP SUẤT
Model SERIES 8000
Hãng sản xuất: ZAHM & NAGEL – Mỹ

Since pressure gauges subjected to agitation frequently go out of
adjustment, means for easily detecting and correcting such error is
imperative, particularly when the gauge reading is critical, as in use
with the Series 1000/2000 Zahm CO2 Gas Volume Meters and the various
Zahm Piercing Devices. The Zahm Gauge Tester (Series 8000) provides a
highly accurate means of re-calibrating pressure gauges in the
laboratory.
NOTE: Pressure gauges can be re-calibrated by mounting them directly
to one of the threeadapters supplied with the instrument. If checking
the gauges on either the Series 1000/2000 CO
2Volume Meters,
the gauge does not have to be removed from theVolume Meter. The
connection can be made directly to theGaugeTester via teVolume Meter's
clampingdevice andP/N 8081 adapterwith bleeder valve.
Be sure to use the correct adapter for the gauge being tested as
gauges with 1/2-20 and 1/4 NPT bottom connections are similar in
appearance. The Zahm & Nagel gauge with bleeder valve isa 1/2-20
thread while allother gauges are 1/8NPT or 1/4 NPT pipe threads.
The Model8000-P is an extremely accurate pneumaticgauge tester
It is simple to use and requires no messyoils or lubricants. Cost is much less than a comparable dead weight tester.
Unit comes standard with a 100psi NIST certified test gauge.
Standard test gauge has been calibrated at 5 points: 30, 35, 40, 45, & 50 psi.
Maximum test pressure is 65 psi.
+ MÁY ĐO KHÍ CO2 & HÀM LƯỢNG KHÍ TRONG CHAI THỦY TINH – CHAI PET – TRONG LON
Model SERIES 7000
Hãng sản xuất: ZAHM & NAGEL – Mỹ

This instrument is used to test beverage or product for CO
2 gas
and air content in either glass or PET containers and cans. It is
automatically adjustable to various size bottles and cans and is
available in either one or two litre sizes. Two standard
pressure/temperature relationship charts are furnished with the
instrument for the determination of volumes of CO
2 gas in
alcoholic and non-alcoholic beverages. The instrument is equipped with a
dual scale pressure gauge (0-60 psi and & 0-4.2 kg/cm
2)
and an adjustable 2" dual scale dial thermometer (25.125ºF &
-5/55ºC). This piercing device is also equipped with a 100cc burette
that measures up to 25cc's of the product's air content.
The parts list and line drawing should be used for assembly and as a reference for ordering replacement parts.

7001
|
Zahm New Style Air Tester W/Dial Thermometer Complete Instrument - 1 Litre Capacity
|
7002
|
Zahm New Style Air Tester W/Dial Thermometer Complete Instrument - 2 Litre Capacity
|
6003
|
Dial Thermometer 2" Dual Scale (25/125 F. & -5/55 C.) 8" Long Stem-Adjustable
|
6007
|
Dial Thermometer Adapter
|
6008
|
Adapter "O" Ring
|
6009
|
Adapter Nut
|
6011
|
Piercing Neddle .703 OAL of Piercing Point
|
6013
|
Rubber Seal
|
6014
|
Stop Pin Collar W/Pin
|
6018
|
Cross Bar - 1 Litre Size
|
5003-25
|
Burette W/Teflon Stopcock (0-25ml) O-100ml Capacity
|
5005
|
Replacment Stopcock for Burette
|
5006
|
Burette Clamp Complete
|
5017
|
Guide Rod (2 Req'd)
|
5017
|
Guide Rod / Support Rod for Burette(1 Req'd)
|
5020
|
Base 1 - Litre Size
|
5022
|
Base Pad (Top) 1 Litre Size
|
5022-A
|
Base Pad (Bottom) 1 Litre Size
|
5026
|
Lock Plate (2 Req'd)
|
5027
|
Lock Spring (2 Req'd)
|
5028
|
Lock Screw (2 Req'd)
|
5038
|
Gauge Gasket
|
5039
|
Gauge Adapter
|
5040
|
Adapter Gasket
|
5043
|
Packing Nut
|
5044
|
Nut Gasket
|
5046
|
Rubber Coupling
|
5047
|
Level Bottle
|
5050
|
Level Bottle Stand
|
5052
|
Connection Tubing
|
5053
|
Can Stop (2 Req'd)
|
5054
|
Can Stop Screw (2 Req'd)
|
5055
|
Whitey Valve
|
5057
|
Hose Nipple
|
5058
|
Nipple Nut
|
5079
|
Caustic Trap
|
5080
|
Plastic Coupling
|
1030
|
Pressure Gauge (0-60psi & 0-4.2kg/cm2) 1/8 Npt Lower Male Connection
|
+ MÁY XÁC ĐỊNH THỂ TÍCH KHÍ CO2 TRONG CHAI THỦY TINH / CHAI PET VÀ TRONG LON
Model SERIES 6000
Hãng sản xuất: ZAHM & NAGEL – Mỹ

The instrument is ready for product testing as received from the
factory but several checks should be made in order to assure that none
of the fittings leak when testing is being performed.
Apply a small amount of "O" ring lubricant to the dial thermometer stem
(6003) and work it up and down to lubricate the "O" ring
(6008). "O" ring lubricant may be purchased from Zahm & Nagel.
Pressurize the instrument and apply a soapy water solution to all
fittings. The formation of bubbles will show any leakage and the
condition can then be corrected. The instrument may also be pressurized
and submersed in an aquarium filled with water and bubbles observed in
this manner.
To Operate:
Close the Whitey TM valve
(5056) an depress the lock plates
(5026) while pulling up on the cross bar
(6018) to a height that will clear the top of the container being tested.
Release the lock plates and the cross bar will remain in that position until the operator is ready to pierce the container.
Raise the dial thermometer
(6003) so that it touches the dial thermometer stop
(6006).
Place the can to be tested upside-down on the base pad
(5022) and center so that the rubber seal
(6013) will line up approximately in the center of the container. Bottles could be tested by piercing through the crown.
Depress the lock plates and lower the cross bar to a point where the rubber seal just touches the top of the container.
Continue to depress the lock plates and with both hands push the cross bar rapidly downwards until the container is pierced.
Release the lock plates. The cross bar will remain locked in place
with the rubber seal compressed to prevent leakage at the point of
piercing. Be careful not to trip the lock plates after piercing as only a
slight upward pressure on the lock plates will release the cross bar.
Hold the instrument at the bottom of the base with the right hand while the left hand holds both the guide rod
(5017) and the dial thermometer stop
(6006).
Shake the instrument with a rapid back and forth motion until maximum
gauge pressure has been obtained. Record this pressure for future chart
calculations of CO2 gas volumes.
Insert the dial thermometer down into the container to its fullest
extent and leave it there until a steady temperature is obtained. The
time required for a steady temperature reading may be thirty seconds or
longer, depending on the temperature of the product being tested. Record
this temperature for future chart calculations of CO2 gas volumes.
Note: DO
not record pressure readings when the dial thermometer is inserted into
the container. This will cause a false pressure reading and resulting
error in the number of volumes of CO2 gas.
When the pressure and temperature have been recorded, refer to the
correct pressure/temperature relationship chart. Be sure to refer to the
correct chart when determining the volume of CO2 gas. Charts for both
alcoholic and non-alcoholic beverages accompany the instrument.
After the test has been completed bleed off the pressure in the
container by slowly opening the Whitey valve. To prevent the product
from spraying the operator a piece of plastic tubing should be attached
to the hose nipple (5057) of the Whitey valve and the product drained
into a sink or suitable container.
Withdraw the dial thermometer until it touches the dial thermometer stop.
Depress the lock pates and raise the cross bar to clear the container.
Close the Whitey valve and remove the container. The instrument is now ready for the next container to be tested.


6001
|
CO2 Tester Complete W/#6003 Dial Thermometer & #1030 Pressure Gauge
|
6003
|
Dial Thermometer 2" Dial, Dual Scale (25/125 F -5/55 C.) 8" Long Stem, Adjustable
|
6006
|
Dial Thermometer Stop
|
6007
|
Dial Thermometer Adapter
|
6008
|
Adapter "O" Ring
|
6009
|
Adapter Nut
|
6011
|
Piercing Needle .703 OAL of Piercing Point
|
6013
|
Rubber Seal
|
6018
|
Cross Bar For 1 Litre Size
|
5017
|
Guide Rod
|
5020
|
Base 1 Litre Size
|
5022
|
Base Pad (Top) For 1 Litre Base
|
5022-A
|
Base Pad (Bottom) For 1 Litre Base
|
5026
|
Lock Plate (2 Req'd)
|
5027
|
Lock Spring (2 Req'd)
|
5028
|
Lock Screw (2 Req'd)
|
5038
|
Gasket
|
5039
|
Gasket Adapter
|
5040
|
Gauge Gasket
|
5043
|
Packing Nut
|
5044
|
Nut Gasket
|
5053
|
Can Stop (2 Req'd)
|
5055
|
Whitey Valve
|
5056
|
Whitey Valve Complete with #5057 and #5058
|
5057
|
Hose Nipple
|
5058
|
Nipple Nut
|
1030
|
Pressure gauge, 2" dia. (Dual scale 0-60psi & 0-4.2kg/cm2) 1/8 NPT lower male connection.
|
+ MÁY ĐO HÀM LƯỢNG KHÍ
Model SERIES 5000
Hãng sản xuất: ZAHM & NAGEL - Mỹ

To assemble, use a little lubricant on the stem of the burette
(5003-25) and the level bottle (5047) and immerse the connection tubing
(5052) and the rubber coupling (5046) in hot water to facilitate
insertion of the tubing. Now connect the rubber coupling (5046) to the
center stem of the burette and connect the other end of the coupling to
the hose nipple (5057) of the Whitey valve (5055). Connect the
connection tubing (5052) to the side stem of the level bottle (5047).
Assemble the burette clamp (5006) around the burette and fasten in place
on the support rod(5016). Operation: Warning: Caustic Solution is used
in the operation of this instrument. This solution may cause severe
burns to the operator if not handled with care. Wear goggles and
protective clothing while operating this instrument. The instrument is
now ready for operation but should first be tested for any gas leaks
that may occur at various connections. This may be accomplished by
pressurizing the instrument and applying a soapy solution to the various
connections and joints. The instrument may also be submerged in a glass
tank of water, and leaks observed in this manner. The generally
accepted temperature for gas analysis is 77ºF/25ºC. Therefore, it is
good practice to bring samples to this temperature prior to testing. The
volumes of CO2 gas may be determined by taking the maximum pressure
reading during the test and then, immediately after the test, inserting a
laboratory thermometer into the sample and recording the temperature.
The CO2 content can be determined from any standard temperature/pressure
relationship chart using the above information.
1. Close the Whitey valve (5056), open the burette cock (5005) and
put approximately 100cc's of water in the level bottle(5047), elevating
the same above the burette so as to allow the water to run down into the
burette to the bottom of the calibrations.
2. Close the burette cock and lower the level bottle to its stand (5050)
3. Place a small beaker of water under the rubber seal(5045) and
lower the cross bar (5024) so as to submerge the rubber seal in the
water. Note: The cross bar is lowered by depressing the lock pates
(5026) on each side of the cross bar and pushing downwards. When the
lock plates are released, the cross bar will remain firmly locked in
position.
4. Open the Whitey valve (full). This will cause the water top be
drawn upward through the Whitey valve, displacing any trapped air in the
system. Tap the tubing to release air into the burette
5. Close the Whitey valve and remove the beaker from the piercing needle (5042A)
6. Open the burette cock and allow the water to return to the level bottle. Discard the water.
7. Replace the water in the level bottle with caustic solution,
filling it approximately half full. Note: Wear protective clothing and
goggles when using caustic solution. A 20% solution of either Potassium
Hydroxide or Sodium Hydroxide is recommended for air testing. (* A
weaker solution may be used, but the tests will take longer and fewer
tests can be performed.) To make a 20% solution, slowly add 100 grams of
Potassium or Sodium Hydroxide crystals to 500 cc's of distilled water
and store in a sealed jar. The above solutions may also be purchased
from any laboratory/chemical supply company
8. Raise the level bottle to fill the burette completely and close
the burette cock. To prevent overflow, the caustic trap (5079) is
furnished for attachment at the top of the burette. While filling the
burette, check the plastic connection tubing (5052) and work out any air
bubbles that may be present
9. Place the bottle or can to be tested on the base pad(5022) and
lower the cross bar to the point where the rubber seal just touches the
top of the container.
10. Depress the lock plates and push the cross bar rapidly downwards until the container is pierced.
11. Release the lock plates. The cross bar will remain locked in
place with the rubber seal compressed to prevent leakage at the point of
piercing. Be careful not to trip the lock plates after piercing as only
a slight upward pressure on the lock plates will release the cross bar.
12. Hold the instrument at the bottom of the base with the right hand
while the left hand holds both the guide rod (5017) and support rod
(5016). Shake the instrument with a rapid back and forth motion until
maximum gauge pressure has been obtained. Note: The burette is very
fragile and may break if it comes in contact with an object while
shaking the instrument. Also, be sure that the level bottle and stand
are located in such a manner that they do not tip over while shaking the
instrument.
13. Open the Whitey valve (5056) and allow gas to flow into the
burette, reducing the gauge pressure to 5 psi or less. Shake the
instrument a few times to allow absorption of CO2 gas by the caustic
solution. It is also advisable to invert the instrument and allow the
gas that was released into the burette to be absorbed in the larger
bottom bulb of the burette. The shaking of the instrument allows for
more build up of gas in the test container and for the next release of
gas into the burette.
14. Open the Whitey valve and repeat the above process again. Usually
eight or ten shakes are enough to remove most of the air in the sample.
For very accurate work, however, the operation should be continued
until a constant air reading is obtained. When making the air reading in
the burette, the level bottle should be raised so as to bring the
liquid in the burette and level bottle to the same level.
Air
Readings: If air readings tend to increase after a period of testing,
the caustic solution may be diluting and should be replaced with a fresh
solution. The number of tests that can be expected from the caustic
solution may vary according to the strength of the solution being used.
15. Close the Whitey valve and release the lock plates by pressing
them in an upward direction and then raise the cross bar to a level that
will allow the removal of the container
|
Air Tester Complete W/All Accessories
|
5003-25
|
Burette W/Teflon Stopcock (o-25ml) 0-100ML Capacity
|
5005
|
Replacement Teflon Stopcock
|
5006
|
Burette Clamp Complete (5007 Through 5014)
|
5007
|
Clamp Slide
|
5008
|
Thumb Screw
|
5009
|
Support Band
|
5010
|
Clamp Band
|
5011
|
Screw (2 Req'd)
|
5012
|
Wing Nut
|
5013
|
Screw
|
5014
|
Plastic Band
|
5016
|
Support Rod
|
5017
|
Guide Rod (2 Req'd)
|
5020
|
Base
|
5022
|
Base Pad (Top)
|
5022A
|
Base Pad (Bottom)
|
5024
|
Cross Bar
|
5026
|
Lock Plate (2 Req'd)
|
5027
|
Lock Spring (2 Req'd)
|
5028
|
Lock Screw (2 Req'd)
|
1030
|
Pressure Gauge (0-60psi & 0-4.2kg/cm2)
|
5038
|
Gauge Gasket
|
5039
|
Gauge Adapter
|
5040
|
Adapter Gasket
|
5042-A
|
Piercing Needle (.703 OAL Piercing Point-STD.)
|
5043
|
Packing Nut
|
5044
|
Nut Gasket
|
5045
|
Rubber Seal
|
5046
|
Rubber Coupling
|
5047
|
Level Bottle (250ml)
|
5050
|
Level Bottle Stand (250ml)
|
5052
|
Connection Tube (30")
|
5053
|
Can Stop (2 Req'd)
|
5054
|
Can Stop Screw (2 Req'd)
|
5055
|
Whitey Valve Only-Plated
|
5056
|
Whitey Valve W/5057 Nipple & 5058 Nut
|
5057
|
Hose Nipple
|
5058
|
Nipple Nut
|
5079
|
Caustic Trap
|
5080
|
Plastic Coupling
|
MÁY ĐO THỂ TÍCH KHÍ CO2
Model SS-60
Hãng sản xuất: ZAHM & NAGEL - Mỹ

The Zahm SS-60 Volume Meter was developed to determine average CO
2 levels of gas in tank stored
beverages. Its improved design over the older Zahm-Hartung Volume Meter
(Series 2000) greatly improves accuracy and time required to run a
test. A precise piston release mechanism eliminates bleeding off of the
sample and the potential for human error. Samples undergo repeatable,
precise volumetric expansion test after test for more accurate
measurements. The lightweight design reduces operator fatigue while the
stainless steel construction increases strength and resists corrosion.
The thermometer may also be replaced in the field without the need to
return it to the factory for replacement. The parts list and line
drawing should be used when ordering replacement parts or operating the
instrument.

1000
|
SS-60 Volume Meter
|
1017
|
Thermometer Guard Screw (2 ea.)
|
1040
|
Vent Cock Swivel
|
1001
|
Body
|
1018
|
Thermometer Cushion Ring (2 ea.)
|
1042
|
Aspirator Bulb
|
1002
|
Base
|
1019
|
Thermometer Seal Ring (2 ea.)
|
1042-A
|
Aspirator Bulb "O" Ring
|
1003
|
Base Shield
|
1020-B
|
Valve (2 ea.)
|
1045
|
Gooseneck
|
1004-A
|
Neck Shield
|
1021
|
Clamping Device Assembly
|
1048
|
Clamp Handle Assembly
|
1005
|
Piston
|
1022
|
Clamping Device Body
|
1048-1
|
Front Brace
|
1006
|
Piston Body
|
1023
|
Clamping Device Yoke
|
1048-2
|
Milled Brace
|
1007
|
Piston Handle
|
1024
|
Clamping Device Screw
|
1048-3
|
Rear Brace (2 ea.)
|
1008
|
Piston Lock Pin
|
1025
|
Clamping Device Gasket
|
1048-4
|
Screw - Left Side (2 ea.)
|
1009
|
Piston "O" Ring
|
1029
|
Pressure Guage
|
1048-4A
|
Screw - Right Side (2 ea.)
|
1010
|
Piston Body Gasket
|
1036
|
Sight Glass
|
1048-5
|
Lock Washer (6 ea.)
|
1011
|
Base Screw (6 ea.)
|
1037
|
Sight Glass Cage
|
1048-6
|
Cap Nut (4 ea.)
|
1012
|
Thermometer
|
1038-A
|
Sight Glas Gasket (Top)
|
1048-7
|
Handle w/Rubber Sleeve (2 ea.)
|
1016
|
Thermometer Guard
|
1038-B
|
Sight Glass Gasket (Bottom) |
Labels: đo áp suất trong chai, Máy đo CO2 trong chai, MÁY ĐO KHÍ CO2 TINH KHIẾT & HÀM LƯỢNG KHÍ TRONG CHAI THỦY TINH – CHAI PET – TRONG LON, ZAHM & NAGEL – Mỹ, ZAHM & NAGEL Vietnam